Friday, November 22, 2013

Churn Dash variation tutorial

Hey peeps!!

So, I'm back with a tutorial for you! :)

This is a variation on the Churn Dash quilt block. I love the look of it, just a bit different from the typical block, but still most definitely a Churn Dash. This tutorial will give you a 12.5" (unfinished) block. So...let's get to it!

Churn Dash variation block

For this block you will need 3 different fabrics: a light, a medium and a dark. (You can obviously use whichever fabrics you like, but you definitely want some sort of contrast, be it value or pattern)

My fabric pull for this block. A light, medium and dark.

When giving cutting measurements, I am always slightly generous. I prefer to give myself a little wiggle room for sewing and then cut to perfect size after seams are sewn. Also, make sure that whatever length you cut your strips, cut all three strips the same exact length, it will save you some headaches. ;)

I do most of my sewing late at night, and with the terrible lighting here my pics are usually fairly crappy, but be prepared for worse than normal pics this time. Nothing seemed to be in-focus, which of course I didn't know until after I loaded them onto the computer...too late of course. Live and learn.

Ok, let's get started.

From your light fabric (or fabric #1) cut:
     1 - 2" strip that is 19-20" long
     1 - 7.25" square

From your medium fabric( fabric #2) cut:
     1 - 1.75" strip that is 19-20" long
     1 - 4.5" square

From your dark fabric (fabric #3) cut:
     1 - 1.75" strip that is 19-20" long
     1 - 7.25" square

Here's what you should have after everything is cut.

 Unless otherwise noted all seams are sewn with a scant 1/4".

Place your light and dark 7.25" squares right side together and sew around all 4 sides. Basically you'll end up with a closed square.


Take your ruler and make two cuts across the diagonals of the square.


You should end up with 4 HST's when you open them up. Set and press your seams. You will need to trim your HST's down to 4.5" squares after pressing. When they've been trimmed, set your HST units aside.


Next take your 3 strips of fabric and lay them out with the light on the left, the medium in the middle and the dark on the right. First, sew your light and medium strips together, then sew the dark strip to the medium strip. When you're finished, set and press your seams.

Sew your strips together...be sure to line them up at at least one end the best you can.
You only have a little wiggle room for cutting.

Take your strip set and square off one end. Then you need to cut the strip set into 4 pieces that measure 4.5" long. (Depending on what length strips you cut you will have between 1/2" - 1" of extra so measure carefully! ) When they're cut, you should end up with 4.5" squares.

I love this little 4.5" square. Use it all the time!

Lay out your units like the picture below and make sure your HST units and strip units are laid out in the correct orientation....darks should be toward the center for all units.


Now it's just a matter of putting your 9 patch together.... sew your units into rows and then your rows into the final block.

Finished!

Be sure to set and press all your seams and verify that your block measures 12.5" square. If it does...you're finished!!

It's an easy block that looks more complex than it is. Gotta love that, right?! :)

Thursday, November 7, 2013

Let me reintroduce myself....

*Dusts off the blog*


*tap tap tap* Anyone still out there?!

Hello peeps!!

To anyone that is by some miracle still hanging around or happens by...please, let me reintroduce myself.

I'm Angela, your terrible blog owner!! Y'know, the one who disappeared for months and almost didn't return. *ahem* oops!!

In all seriousness, I have been gone for a very long time. To say I had a rough summer would be an understatement...not my best, that's for sure. We had a lot of things hit us over the past few months. Some of it really got to me and made me doubt some things. And truth be told, I had seriously considered shutting things here down and not coming back to my online/crafty spaces.  I have other interests, and I could easily pick up and concentrate on one of them instead.

But. I decided not to be rash and to instead think things through first.

I did a lot of soulsearching over the month or so and decided giving up and moving on to something else just is not the answer. So, I took some time, got myself and my feelings about things in order, talked other things over with Mr. Man  ....then I took a deep breath and decided it was time to come back and start fresh. So. Here's to better times ahead!! :)

Hope you'll stick around for the journey. I always need some wonderful peeps to keep me company. And I promise to do my best to be a better blogger ...y'know, actually post and stuff!!! LOL ;)

Wednesday, April 3, 2013

Hey there Delilah

I mentioned that I would have a bit more to say about my new machine, so thought I'd write up a quick little review of my new machine (ha!! Who are we kidding!? This is me we're talking about....I'll try to make it quick but no promises! rofl).

Meet Delilah. :)


Do not ask me where I came up with the name cuz I really don't know. It just kinda popped into my head and then the song "Hey There Delilah" by Plain White T's got stuck in my head and wouldn't leave so...Delilah it was!

The Janome Horizon 7700 isn't a new model, it's been out a few years already. Actually, this particular version is being discontinued....they've come out with a 'new' 7700. The new 7700 is basically the same machine with just a few changes as far as I can tell: they added the 'New Home' portion under the Janome name, they also took away the beautiful red front, it's now a very pale grey, or white, I forget which. It's actually able to be sold online now as well (before the change, per Janome's rules, it was only able to be purchased locally). All things considered, I'm glad I was able to get one of the remaining 'old' Horizons.

I LOVE the red....love love love it. It's beautiful and one of the first things I fell in love with about the machine. It just calls to you from across the room and it's lust at first sight. Kind of it's own version of the little black dress!! Hey....I like a good lookin' machine, what can I say?! ;)

The lighting on this machine is great. 5 LED lights, one set of which shines on the bed area. So, all in all, you can actually see what you're doing when sewing on this machine! (Novel idea huh?! lol) I still use my ottlites of course, but they're almost not absolutely necessary like they are with other machines I've used.

The stitches are plentiful. A little bit of everything and they're all grouped well and pictured for easy selection right on the lid of the storage/threading area of the machine. (No more knocking off the stitch card or having to look em up in the manual like The Babylock.) Do I need 250 stitches? Of course not, but they're fun and will give me things to play around with when I'm looking for a decorative stitch. There's also a couple of cute ones that I actually see myself using for various things. :)

Some very cute decorative stitches!

The touchscreen works very well and leaves everything within easy reach. There's also a jog dial with a selection button which some people like and some don't. Personally, I don't mind it....I like being able to scroll thru things quickly to find what I like rather than repeatedly tapping the touchscreen umpteen times to get to what I need. A number pad to just punch in the stitch number you want would have been nice honestly, but the dial is fine. I'll get used to it and it won't bother me at all. I think it will also be nice for those days where my fingers don't want to work so well. Big storms wreak havoc on my hands and something big and tactile vs. a touchscreen is often helpful on those days. There is a little stylus to use on the touchscreen as well, that has it's own little place in the top storage. I rarely use it, my fingernail is usually quicker.

The APC -Automatic Plate Converter- feature is one of the main features that drew my attention. At the push of a button a plate magically slinks into position converting it into a single hole needle plate. Now, I know you can buy a single hole needle plate for any machine out there, but A) those usually require you to use a screwdriver to change it out...each time and B) I know myself...I'd bust more needles than it'd be worth to use. LOL With the APC, the machine monitors everything....if the APC is engaged it will not allow you to select a stitch that requires the wide stitch plate. Jackpot!! No broken needles for this girl! Well, at least none related to forgetting to switch a stinkin needle plate. :D

The arrow is pointing to the APC plate. That little plate slides back and forth at the touch of a button to turn it into a single hole needlplate.

The Accufeed (AF)... Janome's version of dual feed. Some have said that it's big and bulky, that the feet were too wide and in the way or not as effective as they could be. Well....I look at it this way. Without this feature, I'd be using a walking foot...talk about something being in the way! Yep, I'll take the Accufeed tyvm. :)

The feet and storage are another thing that's welcomed. There's not only the typical storage in the compartment by the freearm, but there's storage behind the freearm as well as on the top of the machine. There's a place for each foot as well as bulk storage for odd things...like the extra AF feet! They are oddly sized so having an area that they fit so perfectly is fantastic! I love having a place for everything! Janome includes the normal AF foot with the machine, but my dealer also thru in the open toe version as well as the 1/4" AF foot. The only AF foot I'm missing, and will likely pick up at some point, is the edgestitching/ditchstitching foot. I did use that alot on my other machine. I like it for edgestitching when I make bags and such. The non AF feet are nice as well and they include a good selection of helpful feet with the machine....the 1/4" piecing foot, edgestitcher, cording, open toe, etc. And last but not least, I L.O.V.E. the quilting foot Janome designed. It's adjustable and doesn't hop!! I don't like hopping feet and typically break off the little bar that makes any feet hop anyway, but this one is adjustable so that it just skims the surface of the quilt you're working on. It's awesome....and has multiple feet to choose: a standard quilting foot, open view foot, and echo foot. All neat and tidy.

Yes, that is where Mr. Owl sits most of the time! ;)


I also love the way she FMQs!! No eyelashing, no thread mess on the back, no tension issues or stitch ugliness. I can definitely improve my FMQing now. And, speaking of quilting....let's not forget to mention the 11" of harp space she has!!! *gasp* That's pure crazy!! heh I will surely be able to quilt any quilt my little heart desires now! I could house a small village of Mr. Owls in there I swear! :)


I'm usually one that likes my machine to be dropped into a table. Since Delilah is so much bigger than The Babylock, it doesn't fit into the table I had, so I need another and Curt's going to build me one......once it's warm enough that is. Damn winter messing with my plans!!! So, for now, my machine is sitting on top of a plastic folding table...much to the poor table's displeasure. lol I've had to take a piece of wood to brace the table under the machine as it was starting to bend and bow due to all Delilah's weight! LOL She's a hefty gal. ;) Anyway, since she's relegated to the table top, I've been thrilled to use the acrylic extension table Janome includes with the machine. I never used the one on The Babylock, even when I had to sew on a tabletop. This one tho is so much nicer. It's clear for starters....that means I can see the things I place underneath it and nothing gets lost. *snicker* I also like that the feet are removable and straight. They make the table more sturdy and stable than the other one's I've used. Being removable will also help when Mr. Man builds me my table as I can remove the legs and use it as in insert instead of having to pay for a separate one. All in all, it's workin' for me.


Of course she has all the normal features you'd expect of a modern machine...needle up/down, thread cutter, start/stop button, needle threader, pressure foot adjustment, lockstitch, knee lift (adjustable which is nice). And some very nice things that you don't see....metal frame, metal parts instead of plastic, a dial to adjust the feed dogs or align stitches that are 'off' as well as another dial that allows me to adjust the AF...speed up or slow down the top feeding to match the bottom. Oh! AND the switch to drop the feed dogs is in a convenient location for a change...right by the power button, NOT under the free arm where you either need to remove the storage drawer or dig under a table/lift the machine out of the table to access it!! That's one of those things you don't realize how nice it is until you have it. Odd things to have for sure, but all very helpful!!

There are of course things I wish were different about the machine....well, not so much different I suppose as things I do actually miss from The Babylock or wish worked just a bit differently. The things I miss that The Babylock had...a Fantastic automatic needle threading system. Delilah has the typical assisted needle threading....pull down the little thingy (yes...that is the technical term!!! Ha!) catch the thread in the little hook and let the thingy go and finish pulling the loop of thread thru. With The Babylock it was just a matter of threading the machine correctly (there was an extra little holder doojobby at the end) and then pushing a lever...presto...done and fully threaded! I miss the fast bobbin winding feature...rather than sticking the thread thru the little hole, then winding a few go-rounds, stopping and trimming before finishing the winding, you simply wound the thread around the bobbin 5 times or so, caught the thread in another little holder doojobby and then wound it. Other things I need to adjust....while I love the thread cutter, it cuts the threads a bit short for me. I like my tails a bit longer so I can bury them if needed....Delilah cuts em to just shy of 1/2". Kinda rough to bury them that way. I also don't like the thread nesting at the beginning of stitching. I was hoping to leave the threadbunny's in the past, but no...still gotta use them. So, nothing that's really terrible or that I can't live with, but there always has to be a few things you wish were different. ;)

Now, what is the thing that surprised me the most about Delilah? The sheer size!!! OMG. You cannot get an accurate idea of the size of this lady from any online photos. I had looked at a million photos of this machine before walking into my dealer's shop and when I saw her, my jaw nearly dropped. I'm not joking. I wanted to come up with a way to accurately give you all a true indication of her size. So, I came up with this....photos of her next to our Brother machine for comparison. The Brother is a pretty typical mid sized machine, so I think it shows her true size in an understandable way. She is massive...and I love her. :) With the full metal frame she's very heavy....which translates into sturdy and steady and I like that very much. I don't care for wimpy little machines that bounce all over the place when stitching at full speed! She's got a lot of space to spare which I like as well. After all, gotta get that 11" of harp space from somewhere! lol


So far I'm very very happy with my machine. And I don't see that changing any time soon!! It's amazing the relief you feel when you no longer dread the thought of a big project. Which is even more wonderful since my Newbee Quilters bee quilt measures about 106" by 100"!!! Seriously don't know how it got so large!! But I look forward to quilting that one now. :)


Sunday, March 17, 2013

Google Reader shutting down

Hello peeps! :)

I've heard that Google is giving Google Reader the axe!! *gasp*

I honestly didn't use Google Reader, so this doesn't affect me much, however I know many do so thought I'd post my recommendation for a replacement.

I've used Bloglovin' for a couple of years now and am completely thrilled with it. It's easy to use and easy to set up. For those of you that are moving from Google Reader, I believe there's even an option to copy/port your full reader list all at once making the switch that much easier...I'd have to look into the how part, but if you need help, let me know, I'd be happy to help!

If you use Google Chrome there's even an addon that will alert you when there's a new post to one of the blogs you follow...honestly, that's one of my favorite features!! I'm kinda geeky like that. lol I know at a glance if there's anything new to read or not. There's also an option to categorize the blogs you follow. All in all, it's a great reader and I've been seeing that many have already made the switch and are happy with it.

I know many of you have already found me over on Bloglovin', (Thank you!! :) but if you haven't, in my sidebar over there you'll find my "Follow this blog on Bloglovin'" button....click it and that'll take you to where you need to be. I know many other bloggers are now adding buttons to their blogs as well. We're trying to make it as easy as possible on all of you to keep following the blogs you love! :)

Following a blog that doesn't have a button is also easy. Simply copy/paste or type the url of the blog you want to follow into their search box...Bloglovin' will then find it and you can click follow. Done.

Good luck deciding on a new reader and I hope you'll continue to follow me on whichever one you choose. :)

Wednesday, March 13, 2013

Sew Happy

Sew....sew happy!!

I was lucky enough to get a new sewing machine a week or so ago and have been beyond giddy since! :) (side note: Thanks babe....again!! ;)

If you had told me, even just a few years ago, that I would have a two thousand dollar sewing machine, I'd have laughed you out of the room and told you you were crazy! I don't need a machine that expensive to sew! *pfft*

I wasn't always into sewing. Matter of fact, I started out with knitting and crocheting...but once I started working with fabric instead of yarn, I never looked back.

The machine I learned on was an inexpensive Brother from Walmart. It was a gift and while it was very thoughtful, it didn't take me long to grow frustrated with that machine. It was riddled with tension problems & feed dog issues, among other things. But my love for sewing was already set, so I began to look for a better machine.

I found a Kenmore, an 'electronic' machine. It was sturdy and well built, still had a lot of metal as opposed to plastic parts, it got great reviews, and had some features that I was blown away by. Feed dogs I could lower! *woot* Speed control slider!? Drop in bobbin! *gasp* A needle up/down button!?! *Are you freakin kidding me?! * Back then those were 'newish' features just being introduced to the majority of machines, previously only available on the TOL machines and obviously as a newish quilter I was not familiar with them, but they sounded fantastic!

That machine sat on my "wishlist" for a long time simply because it was a $300 machine and at the time, that was a lot of money to spend on a 'hobby'...still is a lot of money of course, but in a much different way. I am also prone to getting a severe case of 'the guilts' when making purchases for myself (ask my daughter what I was like last week after purchasing my new machine!!! oye...she'll give you an earful!! ;) Back then I also had to convince and talk my ex (then husband) into the purchase. Not an easy task in and of itself. Eventually tho, the machine went on sale and I was given the go ahead to buy it.

I loved that Kenmore!! It opened up my sewing world...so to speak. I improved drastically when I was able to concentrate on what I was creating and how I was doing things rather than trying to sort tension issues or just sew a straight seam!! It served me well for a good many years.

Fast forward a bit....to three short years ago.  My marriage ended and my kids and I had moved on. I met Mr. Man (again) and we were happily building a new life together. Quilting and sewing was important to me, my creative outlet. I still had the Kenmore and tho I had outgrown it, it was a great machine. I longed to do some things that it wasn't well suited for...namely FMQ. I could never get the tension right on that machine for FMQ...no matter what I did, the backs of my quilts looked horrible with thread nests and eyelashing galore. But a year passed and I did what I could on her.

Here's the thing about Mr. Man, he wants me to be happy. Tries very hard to make sure that I am. When he understood that my machine was limiting me, he wanted me to find a new machine that would work better for what I wanted to do. The other thing about him, his philosophy is buy the best you possibly can, don't settle for 'good enough'. A philosophy I'm certainly not used to...even still. So, when I started looking for a newer machine, and somehow ended up in the $1000 range, he wasn't the least bit shocked (well, ok, maybe a hair at first) but he was a trooper and wanted me to get the machine I wanted. It was actually me that kept looking trying to find a machine that was lower cost that would do the same things. In our area tho, it was.... limited. So we went out to visit dealers and when he saw my reaction to the Babylock Melody....he pretty much decided that was going to be my machine. I was excited and hopeful. Brought that machine home and immediately put it to use.

Wasn't long before I had my first issue with that machine, and then another. This is another long story...."The Babylock" (as I always refer to it...in a not so pleasant tone) and it's issues. So to give you the quick, short~ish version....

The machine is a lemon. It throws a fit and seizes up if it's used too much, too often or for too long a stretch. It really is a big baby!! If you baby the thing, only use it for short bursts and don't push it too hard or too often, it behaves. My babylock 'dealer' is an ass. The only thing that 'dealer' was good at was handing out insults. Oh, and assuring everyone that there is never a problem with a Babylock! I won't step foot in either of his stores again. (I've also since learned that he has quite the bad reputation...throughout the state! My new dealer, who's 1.5 hours away knew who I was talking about when I said I had problems with my previous dealer....and I didn't even mention names!!) So, in short, I was stuck and had to learn to deal with my machine's lemonyness.

I consider myself a quilter. I'm not a seamstress or sewist, I'm a quilter, period. Which is why, if you consider that, the fact that I haven't actually done a quilt in over two years is so very very pathetic!! I've started many, but they're all sitting unfinished in piles...pieces cut, some blocks done, but none even have the tops completed. I always knew if I completed the top, I'd get depressed that I wouldn't be able to finish it. I had to give up quilting and instead only work on smallish things....bags, home decor stuff for the house, etc. Projects that wouldn't set my machine off. All to please a machine that I really had grown to hate...learned to live with, but hated.

This always made Mr. Man upset. Mind you, he was right there for all of my frustrations, hearing the machine seize up and throw its little fits. He knew what I had been thru with that machine....and with the 'dealer'. We were both upset that this was supposed to be my dream machine...the thing that made my wonderful hobby a pleasure again and allowed me to learn more and grow as a quilter. Instead it did exactly the opposite, and drove me away from my favorite passtime.

Then he got into quilting himself. And he understood even more. That's when he really decided that I needed a new machine....again. Sweet man....all he asked was what it was gonna cost him. lol ;)

Now, over the course of those years dealing with The Babylock, I had come to learn a few things. Finding a good dealer is as important as the machine itself. Not close, not second to the machine but just as important. Your dealer can truly make or break your whole experience. I really don't fault Babylock for my machine issues, I've heard great things about them as a brand and know most people love theirs, but because of the experience I had with this dealer, I will never buy one again; even if I were to move. I've been completely soured to them because of his actions. And I will definitely tell anyone I can to never buy from him...and he's the only authorized dealer in our area. Sorry Babylock!! (They weren't much more help, when I contacted the company directly, they referred me to my dealer *sigh*) A more thoughtful dealer may have actually looked into my machine's issues and found out I wasn't the only one that had this problem. Had the machine been fixed or replaced I would have likely been a customer for life because Babylocks do have some really kickass features. I L.O.V.E. the automatic needle threader, it's truly automatic...run your thread, push a lever and it's done! And the bobbin threading is awesome. Among other things, those always stood out and I knew they'd be features I missed. But that's not the way things worked out. So, instead, I looked elsewhere.

Over the years, when angry with The Babylock, I would go and drool over other machines...mainly 3: the Janome Horizon, the Viking Sapphire and a Juki. Yet when Mr. Man said it was time to get a new machine, I kind of balked.

I knew what I 'wanted'...but 2 of the 3 were around $2000 and the Juki...while more affordable and a fantastic machine, it's only a straight stitch machine. Great at what it does, but I did want some other features and wasn't sure if it would suit me long term. So, once again I began looking to other machines....cheaper machines. After all, while the machine's I'd been oogling over are beautiful and fancy and definitely worth it, I don't need an expensive machine to sew!!

I kept looking and searching, but honestly after everything I had been through with The Babylock I was very leary....of all machines. heh. I started researching dealers instead of machines. And, slowly, I began to let the idea of actually getting one of those expensive machines that I really didn't need creep into my mind. I kind of knew that if I ended up with a machine that was missing any of the features or wasn't what I really wanted, I would always be disappointed. I had put the Janome on the top of my dream list so I began to 'just look'. I knew there were a couple different dealers within a reasonable distance (for me reasonable was truly anything within the state) so I just wanted to see what I could find about any of them, good or bad. With the importance of a good dealer being at the top of my 'must have' list, I had no problem with a dealer a bit further from me than my own town. I would trade the cost of the extra distance for someone who I could trust and rely on.

A couple months back Lee of Freshly Pieced posted an update about her own 7700. She lives in my state and had some issues when her own original dealer closed shop shortly after she purchased her machine. So, when she wrote that post and mentioned the incredible service she received from a Janome dealer in Sheboygan Falls, I knew where to start my search.

I read reviews, poured over his website...more than once, exchanged some emails. And Darryl, from The Sewing Machine Shop won my vote! Mr. Man and I quickly planned a road trip down to check out his store and planned to stop at a couple other shops along the way, ya know, just 'to look'.

Darryl was great. He was incredibly helpful and pleasant. Great customer service is most important to him, and it shows. We spent three hours in his store that day. He had others in the store when we arrived...was giving someone a mini course or something similar on using a serger, they were both creating something when we walked in. And another bunch doing something else in another room. He managed, with the help of his wonderful family that helps out in the store, to work with both the woman on the serger and us at the same time. And to handle other customers who happened thru while we were there. We got to meet and see how his family helps in the store (they're mentioned in his website), and they were all so polite and helpful. :)

He dug the machine out of the back room (with the new models out, he had only one left in the store and it was still boxed up) and set it up so we could test it and play around. He went over everything about the machine, gave us threads and fabrics and sandwiches to play with and then talked with us at great length about the good, the bad, and even the ugly. He was refreshingly honest. I was of course in love with the machine before we even arrived, but Mr. Man was convinced by the time we were done that I needed that machine. Ha!

At the end, we were faced with a decision. Two of the dealers we stopped at had the machine I was looking for, or could get it. Both were asking the same amount for the machine (tho one did throw in some goodies!! ;). One dealer was in my own town and only 15 minutes away, the other was an hour and a half's drive away. SO, which did I choose?? The dealer that was an hour and a half away. Why?? Because I felt much more comfortable and confident with him than I did with the dealer from my hometown. THIS is how important the dealer was to me. After everything I read and in talking with him myself, I know that he is the one that I will be able to trust and rely on, anytime. He got my business. And after those three hours in his shop, we drove home with this:

Mr. Owl is already dutifully watching over Delilah. What a special lil guy he is. :)

Yep, I definitely would have been surprised a couple of years ago to know I'd someday be sewing on an expensive machine like this, but with all the events of the past few years, I am thrilled to do so. I have more than proven I am capable of sewing on the most finicky, tempermental machine out there (albeit begrudgingly!). My original statement at the beginning of this very long post needs a slight addition: I certainly do not need an expensive machine to sew, but damn, it sure is fantastic to be lucky enough to do just that!! ;)

Well, this post went in a completely different direction than I intended. So, I'll be back with a 'part 2' with the actual info about my fabulous new machine (I've named her Delilah!) and what I think about her. An initial review so to speak.

One of these times I will also show you all that I don't always have to write a novel length post! I can write a short post....maybe! lol :)

Wednesday, February 27, 2013

Tutorial: 12" Double Hourglass Block

Alright peeps...it's that time again!!

We have a King!! :D

Today we're doing a tutorial for the block chosen by the King of March, Mr. Man himself! Curt's chosen the double hourglass block for his month. He's looking for some good bold colors in these blocks and asking for you to choose fabrics that play nicely together (coordinate) yet have some good contrast. Prints or solids...both the same or mix em together, he's good with any of it. So, have fun with this one. :)

Because he wanted a 12" block (well, 12ish....we've had some troubles with the size....more on that at the end tho), and we weren't able to find a tute for that size, I just decided to write up a quick tutorial. It's not a tough block but you are working with bias edges and that does make things just a bit more complex. There's lots of pictures for this one, so lets get started! :)

For one block you'll need:
2 strips of coordinating fabrics, each strip should be 3.5" wide x WOF (width of the fabric) (if you are purchasing fabrics, 1/8th of a yard will be enough)

You'll also need your ruler and a rotary cutter for this one. I have some painter's tape in the photo as well because I'm gonna show you a little tip to make the cutting a bit easier. Won't make much difference for one block, but if you want to do a quilt of these blocks for yourself, it'll be a timesaver! :)

The fabrics for this block weren't playing nice with the camera. So, the colors may look off or just not right in some photos...did my best during editing, but some were rough. lol

materials


First, cut your strips to 3.5" if they aren't already.

Unfold both strips and lay them right sides together. Pin one side (if you do that sort of thing....I don't, I just throw caution to the wind and go! heh)

strips rst


Sew the strips together along one side using a scant 1/4" seam. Set and press your seam. This one's a little long, so it may take a little while. ;)

sew together


Take the strip set to your cutting mat.

We're going to lay out the strip set and cut some out some triangles for the block using the 45° line on our rulers.

Remember when I said I had a tip for you? When making many of these blocks, it can be helpful to use a piece of painter's tape to mark off the 45° line so that it's quickly lined up. So...take a piece of tape and just stick it right to your ruler. I place it just above the line rather than directly on it...makes lining things up still possible. I use painter's tape, but any low tack tape will work, it won't leave a residue on your ruler when you're finished and remove it.

tape the 45degree line


One other thing I want to mention here quick. When we cut these, we'll be cutting on the bias. That means both edges that we are cutting will be very stretchy and easy to distort. So, when picking them up or moving them around, sewing, etc. do your best to not stretch or pull on those edges. It will make a difference! So, now that you're all taped up (ha!) and I've given my little 'bias' warning...lets proceed!! :)

Line up the 45° line on your seam. You want the edge of the ruler to start just a bit past the selvedge of the fabric. (see photo for a better idea of what I'm talking about. The photo makes more sense!)

first cut
The ruler starts just at the edge of the fabric (about where you would normally trim the selvedges).


When you have it all lined up properly, cut across both strips.

close to end


See...done!

Ok, now you're going to flip your ruler over and line up again on the seam using the 45° line...so the ruler will be going the other direction.

Second line up


But this time you want to make sure you line up the ruler with what will be the point of the triangle. This is pretty important as the more accurate you are here the better your block will be! Take your time lining this up and be careful that nothing shifts when you cut.

point
Line up accurately to create a perfect point for your triangle!


You will continue this, flipping the ruler each time until you have cut out 4 triangles. Like so....

4 triangles


When you have cut all your triangles, carefully lay them out in the block pattern. You'll notice that two triangles have color #1 on the outside and color #2 on the inside and the other two have color #2 on the outside and color #1 on the inside. (did I lose ya'll there?! :D lol) Make sure you have 'matching' triangles on opposite sides of the square.

layout


Looking at your layout, take the triangle that's on the bottom and fold it over on top of the triangle that's on the right. Match up your seams and pin.

matched seams
I usually pin my seams directly when matching up, but with these being at an angle, I find it easier to use two pins and stick them on either side. Holds everything in place and I don't distort the seam.


When you're finished with that take the top triangle and fold it down onto the left side triangle and again pin your seams. This is what you should have now....

stitch first seams


Take the pieces to your machine and stitch those two seams....remember, don't pull or force the fabric while sewing! After you've sewn both, set your seams and press.

Now all that's left to do is to sew one set to the other. Again pinning helps here....keep your seams matched up. Take it back to your machine and sew that last seam.

stitch middle seam


When finished, set and press your seam. And that's it! You're finished! :)

Done


You should end up with a block that measures about 12.5". We had varying results, some coming in smaller, which was truly weird. SO, don't be surprised if your block ends up a bit shy this time...it's perfectly ok. With a little tinkering, I'm sure I could figure out the issue, but for now, it is what it is. heh


For the bee members, please DO NOT trim the blocks. As many times as we've made this block, we tend to come out with blocks that vary in size a bit, so he'd like you to just send the block as is and he'll trim them all after they arrive. That way we can go thru and figure out which is the smallest, and trim the others to match.

So....how's your block look??


Tuesday, February 26, 2013

My little sewing space...

Well, this post is long overdue!

Before Christmas I had been speaking about the need to redo my sewing mess....errrrm, I mean space. It wasn't working very well and was mostly a cluttered disaster area with things piling up everywhere. With Christmas around the corner, something needed to give or we wouldn't have a tree!!

*Warning...this post contains some scary pictures!!! Horrific!!! Once you see what my space looked like, you may never get it out of your mind again! So read no further if you have a weak stomach. ;) lol*

**Second warning....this post is LONG!! NO...really long. Just a head's up. Lots of pics and my long-winded self. **

Ok, so, my sewing space is a corner of the living room, an area of about 7 feet by 8 feet. I have to fit a lot of stuff in a little space! Both of the radiant heaters are in my corner as well as the window. I love the heat, but it makes furniture placement a little problematic. Anyway...lets get on with some photos!

Here is the first photo. The state of my sewing area before any cleaning....well, I did a quick pick up the day before but still....

scary space!
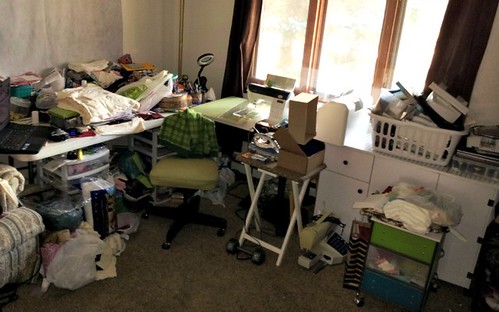
Ok, seriously....this is awful!! And embarassing....the 'can't believe I'm posting this' kind of embarassing!!
Don't ask me how I ever got anything done because honestly...I don't know. Haven't the faintest idea really...but I did. I had my sewing table right in front of the window and a long folding table to my left which served as my cutting table/workspace/storage/computer area. I stored my bulk items (batting, fill, large yardage, WIPs, UFOs, bags, etc) under the table and had my plastic drawers there (you can kinda see them in there lol) as well which held all my quilting supplies and my fabric. I had crap galore all over the top of the table also as you can see. It became a convenient place to just toss my things....used fabrics, scraps, computer junk, papers, etc. My little tabletop ironing board sat just to my right. and I had some more drawers and storage for WIPs.

Part of the issue is that everyone else's stuff ends up in my space. That's a typical mother's bane I suppose. Everything grows legs and walks in on it's own if you ask anyone around here!! That dumbell had some strong legs I tell ya! *snicker*

The large white cabinet on the right had just been purchased and put together a few days before this photo. So, that's just where I put it for storage til I figured out what I wanted to do with my area. Piled everything right on top of it. Hey, it was a surface!! ;)

When Christmas was just a couple weeks away, I decided I had to do something so that we could put the tree up! lol My 'stuff' was taking up too much room. I ended up just going thru and putting everything in boxes. Didn't really pay attention, just started packing it up and stored it all in the basement. Left only the necessities and big awkward stuff upstairs.

This is what everything looked like a couple days after Christmas (it had been neat and tidy~ish before the chaos of Christmas morning with 4 children ;)

still scary!
It was still awful...and embarassing!! *ahem*

Let's fast forward a bit to after the new year. The itch to sew was really setting in...and it was time for the tree to come down so definitely time to start getting to work! And I had a lot to do. I went thru and started by taking out everyone else's crap....errr stuff out of the area and put it where it belonged. I then began to sort and purge. What did I really need and what was I never going to actually use. I got rid of what I could. After setting everything up and moving it around a million times til I found a layout that worked, I moved things around and found a place for everything. At the end, this is what I ended up with.

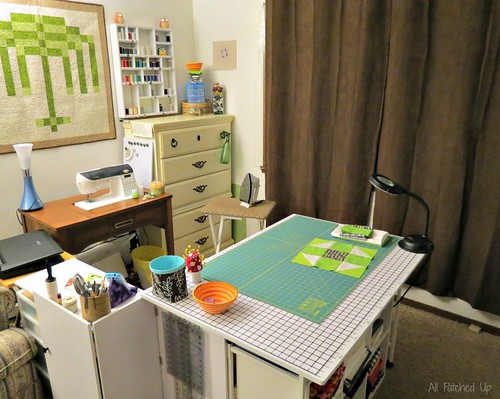
My new, revamped space!! :)

new sewing space

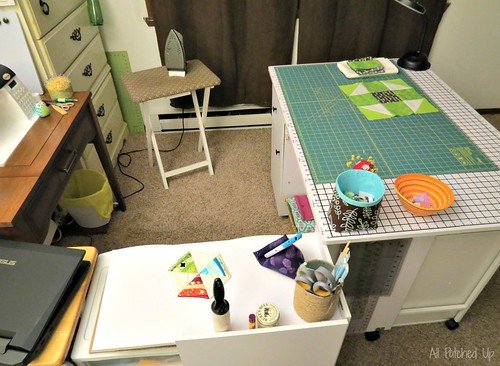
Here's an overview of the new setup. MUCH neater I'd say. Everything has a place and is actually where it belongs! lol And best of all, no one elses stuff has wandered into my area yet (well, for the most part anyway) All these pictures were taken at night, so they are a tad dark/florescent lit and with the curtains drawn makes things darker. But...I couldn't wait. heh Besides, if I had waited, I would have chanced things not being neat and tidy enough for photos!! :D

new space

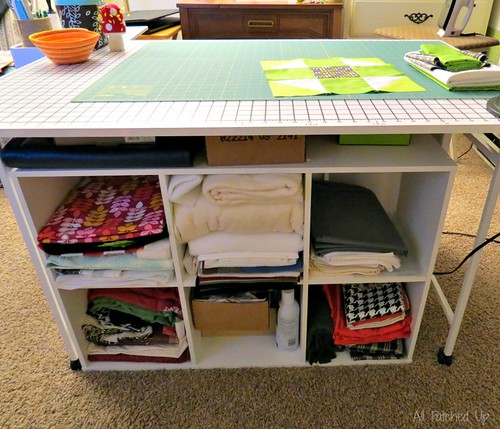
So, that smallish white cabinet that was in the first photo...the one I had mentioned we just purchased....well, when unfolded, it turns into this large cutting table! :) It's fan.tas.tic! Big enough for a 24x36 cutting mat (no more multifolding to cut fabric!) with room to spare so I can put my light, and other little things I need in my cutting area...threadcatcher, pincushion, etc. I use that little rope bowl for scraps...I toss them in there while cutting and when it's full (or, overflowing...whichever) I sort them.

On the side table part, I have room for my utensils cup, my phone, soda, whatever else I need...little things I keep nearby. :) You can also see where I keep my laptop...not ideal, but I make it work.

sewing table

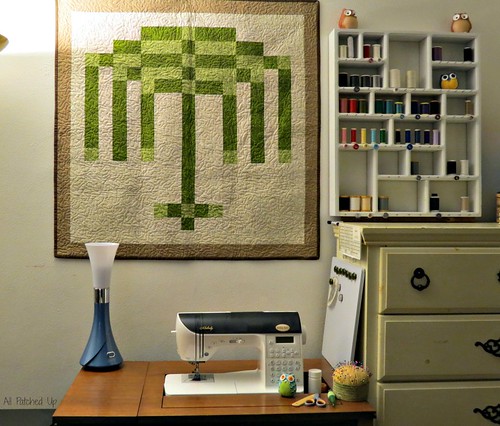
My sewing table. On the wall is my first true 'finish'. The very first quilt I pieced, sandwiched, quilted and bound. I happen to adore weeping willows and when I saw this pattern, I fell in love with it. So, had to do it. Also helped that it was only a wallhanging so it was relatively quick. I stippled it, and didn't do a great job...lots of eyelashing and mess on the back. Think it was more my machine and lack of FMQing knowledge, but I was proud nonetheless. :)

I have the stitch card for my machine stuck to the edge of the dresser right where I can see it. It usually attaches to the handle of my machine, but it's forever falling or getting knocked off onto the floor...generally, just in the way, so attaching it to the dresser (command strips to the rescue!) works much better. I also have a small magnetic dry erase board that I plan on also hanging on that dresser. Then the usual sewing paraphanalia....pin cushion, small scissors, seam ripper, point turner. And my ottlite....gotta have the ottlite!! There is a small bit of storage in my table, just under where the light is....for things I don't use often.

WIP, UFO and overflow

This is the far side of my cutting board. Half the tabletop folds up or down, dropleaf style. Since I didn't plan on it ever being down, I purchased a small cubbyshelf that fits very well under there. This is my overflow space. Where I store WIPs, some UFOs, smaller pieces of batting, larger yardage and misc. things.

rulers

I have two hooks attached to each of the 'sides' of the cutting table to put my rulers. This is one side, and you can see the other in one of the photos above. It's working very very well. They're within easy reach yet out of the way. And usually off the tabletop. Less falling and shuffling means less chance of them being stepped on and broken by one of the kids. ;)

scrap storage

Scrap storage!! Found these little crates that fit just perfectly under here on the smallish shelf. I have em divided up....the three on the bottom are larger scraps (1/4yrd or less) separated into warms, cools and neutrals. The other two bins are strips/strings and then smallish pieces/crumbs. It's working well so far.

Under the shelf you can see some larger scraps I have set aside for another quilt idea I was starting (the bee quilt kinda took it's place for now lol) The box has the scraps Mary sent to me to help with my scrap quilt. (*waves* Hi Mary! :) Soon as I'm done with the bee quilt (I'll have to post an update here on that one sometime this week!) I'll be getting back to work on that scrap quilt...it's really pulling me to start it! lol

The plastic drawers to the right house all my quilting supplies....books, magazines, all the miscellany crap we quilters tend to collect!! One of the drawers also still contains scraps that I have yet to sort. Those drawers are still quite a mess. I'll tackle them someday....sort and reorganize them all. For now, meh...it's hidden, good 'nuff for me!

thread corner

This is the top of the dresser in the corner. My thread storage....I think this is my favorite part of my little redo. Before this I kept all my thread in a bag or a bin, and just dug thru when I needed to change my threads. It really kinda sucked. So, this thrills me. :) I found the little shelf unit at a thrift shop, spray painted it and added the nails for the bobbins. I prefer to store my thread spools and bobbins together so I know exactly what's what. I use both cotton and poly threads so I have to keep it all straight. This works perfectly. I'd rather have somewhere out of the light to put it, but, it's the only place it fits, so it's staying for now. I use thread pretty quickly anyway, so I'm not too worried. I love that it's easy to see what I'm running low on...light greys (my usual piecing thread) by the looks of it. lol I know what to order this way! :) I'm slowly making the switch to a different thread, so this also lets me see what I need to start using up. ha!

In the small silver dish I store my curved safety pins for basting. The large round tin behind it is all buttons, as well as the pretty jar next to it! The small set of drawers are needles and rotary blades. The next container up is floss/thread and in the rope bowl is elastics and ties. The wall...the little tester wonky block I did when making a zip pouch. I was trying to figure out what size to make and how well I'd do making a wonky star this small. I like to tack things up to the wall with old, dull sewing needles. Gives me something to do with them, and they leave a smaller hole in the wall!

watchful owls!
Of course we have some owls!! My little lookout owls. :) The little guy on the right sits up in my thread organizer. He's the first one I made and sat without eyes for the longest time....poor thing. (I told myself he was better off blind...then he wouldn't see when I was about to stick him! ;) I did give him some eyes when I retired him up to the shelf tho. Now he just holds my handsewing needles...which I don't use very often. He likes to feel useful tho!

The other little guy I made when we had the pincushion swap on threadbias. I fell in love with the one I made for my partner so I made him a twin to keep me company and guard my machine. :) I have yet to stick this little guy. He has those big eyes that tear up and give me 'the look' when I come near him with a pin. So, he just keeps me company!  Didn't get a shot of the other owls in my space, but you may catch a peak of them in some of the other photos. lol

fabric drawers

Last but not least...my stash. I spent the better part of two days sorting, folding, organizing fabric! I wanted to put the dresser to use and since my meager little stash had outgrown it's single drawer in the plastic trays, I could organize things better by using the dresser for fabric storage.  The top drawer is my FQ's...the bottom right photo. Altho...Mr Man got to those and has now used a good chunk of them up! lol The other half of the top drawer is for misc things....zippers, ribbons, etc. The 2nd, 3rd and 4th drawer are my yardage....all in color order (which I LOVE!) and folded nice and neat. This has allowed me to see what I'm lacking and need to stock up...kinda low on the yellow and purple...some reds. It also confirms what I typically use and buy. lol Lots of greens and teals and pink! The 4th drawer is my neutrals and my kona solids. Don't know why, I've always kept them separate. *shrug* The bottom drawer holds odd fabrics...knits, blends, polys, denim, novelty and some oddball project items.

Overall, I like the set up,  but in the weeks I've been using the space I've discovered some things I need to fix. The lack of a design wall for starters. Did you notice that went missing?! I certainly have. It's a desperate need for me to figure that one out. I don't work well without a place to put my stuff while I'm working on it. I'm visual and need to 'see' it. I've always had one too which makes it tough to be without. I'm working on the remedy.

But, one thing I didn't expect....or foresee.

I didn't like taking my machine away from the window, but thought I'd eventually get used to it. I did. Shortly after I took all the photos, we ran into a great deal at Joann...there was an Ottlite sale and we ended up with one of the floorlamps and a matching desklamp for the price of just one.  (as of today, both my local Joann's are still running that sale so you may wanna go check it out yourself...It's a 'buy the desklamp get the floorlamp free' deal...$300 worth of ottlites for $100!!) So, the floorlamp sits by my sewing table and the desklamp sits on my cutting table. Mr. Man took over my tulip lamp for use by his own machine. lol We got a lot of light goin on in here when we're sewing!! I love all the light and don't miss being in front of the window much at all.

However, the table where it is, without another table to my left is not working so well. While putting the sashing strips on my log cabin quilt, I discovered how much I missed having that table there to hold the 'excess'. The more sashing strips I got on, the worse it got. So, no matter how much I like this set up, I may have to move it all around again to find something that works better. I really can't imagine how I'll actually quilt that bad boy the way things currently are. So yeah, need to fix that very soon as that one will be ready for quilting in no time.

My computer is also an issue. It sitting on a small tvtray next to my sewing table isn't working well at all. So, that needs to be rectified. If I try to work on something large, it'll be in the way anyway.

So....It's neat, it's tidy, I like the setup for the most part, but I see another redo in my near future. *sigh*

Alright...time to wrap up this incredibly long post. (sorry bout that, I got a bit carried away!) I still can't believe I'm going thru with posting my scary photos, but I made a promise...and I kept it! whew!

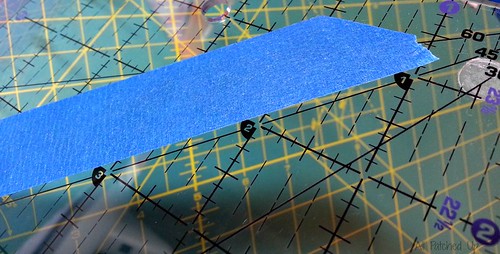
Stay tuned later today (possibly tonight depending on how many photos I have to edit) for a block tutorial. Yep, it's that time again. :)