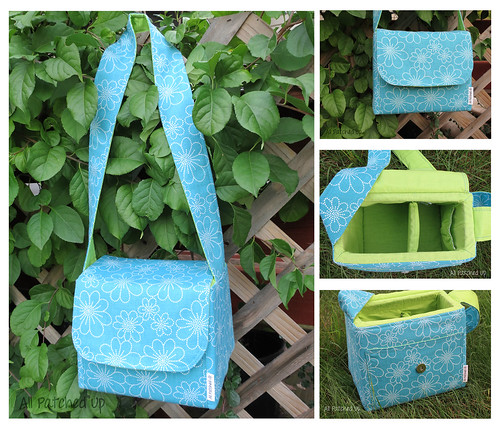
I had an idea of what I wanted, and of course, I didn't just go the easy route and buy a pattern, Hmm, no, not me! Thus....a couple months later, I finally have a camera bag. I procrastinate like a champ like to give myself time to think of exactly what I want in my projects!!
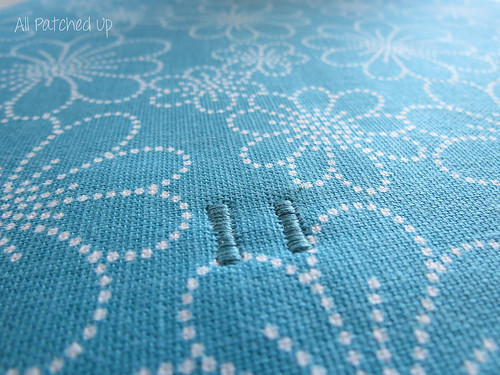
Before I get to the deets, here is why I should learn not to work on things that require measurements or precision late at night...
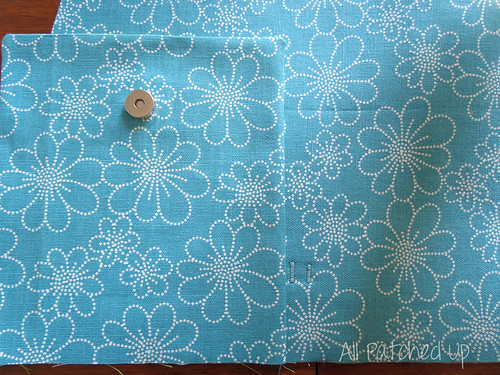
See that there?! Yeah, hmm....nice huh?! Well, those were the little slits I cut to place the magnetic snap. First of all, there's going to be a pocket there so it wouldn't have worked even IF I had put it in the right place and second of all, uhmmmm...yeah, it was in the wrong place. Like, reeeaaallllly in the wrong place. It needed to be about 5-6 inches higher than it was. The photo below shows the pocket with the snap in the right place. I didn't miss it by just a little bit. Yeah, I'm that good!
So, I stuck some fray check on there, and did a little creative sewing to fix the holes that I had cut for the snap. Thankfully, the pocket that's supposed to be there will hide it. *snicker*
All in all, the finished bag is nice and close to what I want. It makes a nice first draft. Ha!! Yep, I'm already planning the new and improved version. While it's an ok bag for now, there were a couple of issues.
First and foremost is the shape. I wasn't really thinking about the foam padding being so stiff when I originally designed the bag. It's wider at the bottom than the top by a good 2 inches. That's great for a flexible bag, but doesn't work quite as well for a stiff, padded bag that doesn't have much 'give'. Getting the camera in and out isn't as easy and quick as I'd like.
My measurements were also off for the magnetic snap. (Don't laugh too hard here people!!) Even after fixing my first snafu with the snap, it still doesn't line up quite right for some reason. So, the fold over flap mostly just flops and doesn't really close unless I really push it, and then it kinda pulls on the flap funny so I generally don't engage the snap. If the bag were to fall over, the camera could theoretically fall out (altho that top being 2 inches smaller doesn't seem so bad now!! LOL).
I really should have made a longer strap, or even better, an adjustable strap. That would leave me the option to make it a cross body strap so I don't have to worry about holding it or it slipping off my shoulder when walking, hiking, etc watching the world thru my lens.
The other issue I have is the lining I chose. This was a project I brought with to work on while up north (not a fabric shop even kinda~sorta~somewhat close up there), and I had quickly stopped to pick up some fabric for the lining on the way. I saw the color and it was perfect, looked like a linen blend so rushing out the door with it, I didn't pay as much attention as I should have. I'm not sure exactly what it is, but my plan was to use Heat-n-Bond on the foam pieces on the lining side...to help keep the lining inside the bag and so on. I've done this before and it works well for me. It was not a good idea with this fabric. The 'glue' from the Heat-n-Bond came right thru the fabric so I only did a little along the top of each side (and it looks like crap btw). So, the lining doesn't stay in place as well as I'd like it to.
There are some good things about this bag tho: I love the HomeDec fabric I chose for the outside and may go back to pick up some more to use with version 2, I used one of my favorite color combos (turquoise and lime green), both the exterior and interior pockets turned out well, the padding does make me feel like my camera is safe & secure and I learned a few things along the way. So, I'll definitely be improving version 2. *grin*


No comments:
Post a Comment