Well, this post is long overdue!
Before Christmas I had been speaking about the need to redo my sewing mess....errrrm, I mean space. It wasn't working very well and was mostly a cluttered disaster area with things piling up everywhere. With Christmas around the corner, something needed to give or we wouldn't have a tree!!
*Warning...this post contains some
scary pictures!!! Horrific!!! Once you see what my space looked like, you may never get it out of your mind again! So read no further if you have a weak stomach. ;) lol*
**Second warning....this post is LONG!! NO...really long. Just a head's up. Lots of pics and my long-winded self. **
Ok, so, my sewing space is a corner of the living room, an area of
about 7 feet by 8 feet. I have to fit a lot of stuff in a little space! Both of the radiant heaters are in my corner as well as the window. I
love the heat, but it makes furniture placement a little problematic. Anyway...lets get on with some photos!
Here is the first photo. The state of my sewing area before
any cleaning....well, I did a quick pick up the day before but still....
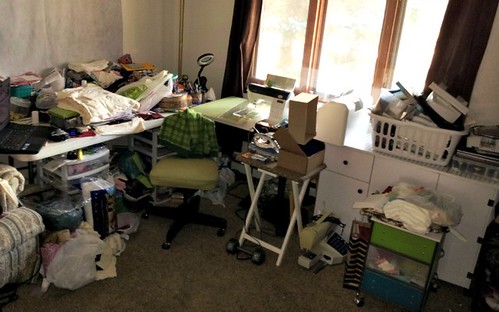 |
| Ok, seriously....this is awful!! And embarassing....the 'can't believe I'm posting this' kind of embarassing!! |
Don't ask me how I ever got anything done because honestly...I don't know. Haven't the faintest idea really...but I did. I had my sewing table right in front of the window and a long folding table to my left which served as my cutting table/workspace/storage/computer area. I stored my bulk items (batting, fill, large yardage, WIPs, UFOs, bags, etc) under the table and had my plastic drawers there (you can
kinda see them in there lol) as well which held all my quilting supplies and my fabric. I had crap galore all over the top of the table also as you can see. It became a convenient place to just toss my things....used fabrics, scraps, computer junk, papers, etc. My little tabletop ironing board sat just to my right. and I had some more drawers and storage for WIPs.
Part of the issue is that everyone else's stuff ends up in my space. That's a typical mother's bane I suppose. Everything grows legs and walks in on it's own if you ask anyone around here!! That dumbell had some strong legs I tell ya! *
snicker*
The large white cabinet on the right had just been purchased and put together a few days before this photo. So, that's just where I put it for storage til I figured out what I wanted to do with my area. Piled everything right on top of it. Hey, it was a surface!! ;)
When Christmas was just a couple weeks away, I decided I had to do something so that we could put the tree up! lol My 'stuff' was taking up too much room. I ended up just going thru and putting everything in boxes. Didn't really pay attention, just started packing it up and stored it all in the basement. Left only the necessities and big awkward stuff upstairs.
This is what everything looked like a couple days after Christmas (it had been neat and tidy~ish before the chaos of Christmas morning with 4 children ;)
 |
| It was still awful...and embarassing!! *ahem* |
Let's fast forward a bit to after the new year. The itch to sew was really setting in...and it was time for the tree to come down so definitely time to start getting to work! And I had a lot to do. I went thru and started by taking out everyone else's crap....errr stuff out of the area and put it where it belonged. I then began to sort and purge. What did I really need and what was I never going to actually use. I got rid of what I could. After setting everything up and moving it around a million times til I found a layout that worked, I moved things around and found a place for everything. At the end, this is what I ended up with.
My new, revamped space!! :)
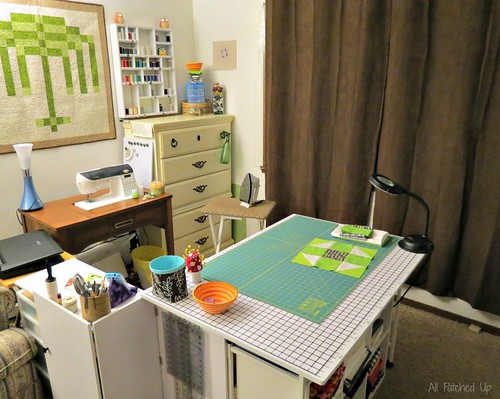
Here's an overview of the new setup. MUCH neater I'd say. Everything has a place and is actually where it belongs! lol And best of all, no one elses stuff has wandered into my area yet (well, for the most part anyway) All these pictures were taken at night, so they are a tad dark/florescent lit and with the curtains drawn makes things darker. But...I couldn't wait. heh Besides, if I had waited, I would have chanced things not being neat and tidy enough for photos!! :D
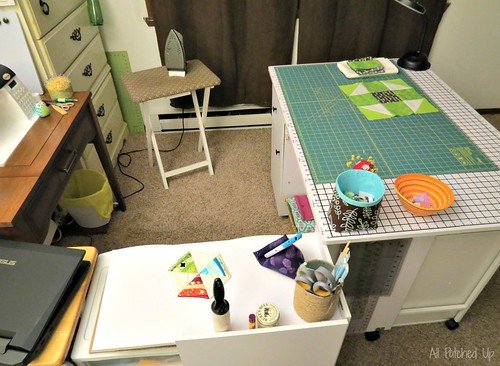
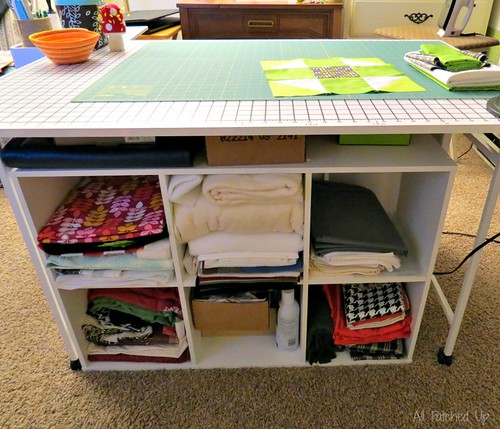
So, that smallish white cabinet that was in the first photo...the one I had mentioned we just purchased....well, when unfolded, it turns into this large cutting table! :) It's fan.tas.tic! Big enough for a 24x36 cutting mat (no more multifolding to cut fabric!) with room to spare so I can put my light, and other little things I need in my cutting area...threadcatcher, pincushion, etc. I use that little rope bowl for scraps...I toss them in there while cutting and when it's full (or, overflowing...whichever) I sort them.
On the side table part, I have room for my utensils cup, my phone, soda, whatever else I need...little things I keep nearby. :) You can also see where I keep my laptop...not ideal, but I make it work.
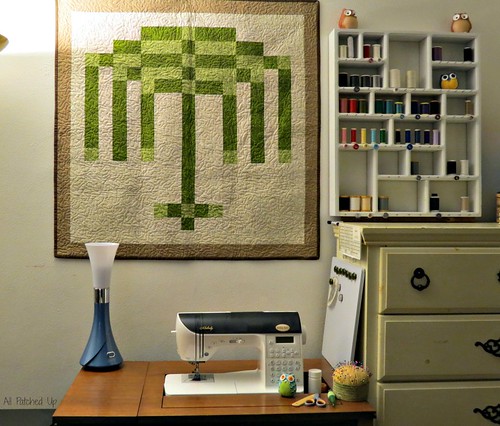
My sewing table. On the wall is my first true 'finish'. The very first quilt I pieced, sandwiched, quilted and bound. I happen to adore weeping willows and when I saw this pattern, I fell in love with it. So, had to do it. Also helped that it was only a wallhanging so it was relatively quick. I stippled it, and didn't do a great job...lots of eyelashing and mess on the back. Think it was more my machine and lack of FMQing knowledge, but I was proud nonetheless. :)
I have the stitch card for my machine stuck to the edge of the dresser right where I can see it. It usually attaches to the handle of my machine, but it's forever falling or getting knocked off onto the floor...generally, just in the way, so attaching it to the dresser (command strips to the rescue!) works much better. I also have a small magnetic dry erase board that I plan on also hanging on that dresser. Then the usual sewing paraphanalia....pin cushion, small scissors, seam ripper, point turner. And my ottlite....gotta have the ottlite!! There is a small bit of storage in my table, just under where the light is....for things I don't use often.
This is the far side of my cutting board. Half the tabletop folds up or down, dropleaf style. Since I didn't plan on it ever being down, I purchased a small cubbyshelf that fits very well under there. This is my overflow space. Where I store WIPs, some UFOs, smaller pieces of batting, larger yardage and misc. things.
I have two hooks attached to each of the 'sides' of the cutting table to put my rulers. This is one side, and you can see the other in one of the photos above. It's working very very well. They're within easy reach yet out of the way. And usually off the tabletop. Less falling and shuffling means less chance of them being stepped on and broken by one of the kids. ;)
Scrap storage!! Found these little crates that fit just perfectly under here on the smallish shelf. I have em divided up....the three on the bottom are larger scraps (1/4yrd or less) separated into warms, cools and neutrals. The other two bins are strips/strings and then smallish pieces/crumbs. It's working well so far.
Under the shelf you can see some larger scraps I have set aside for another quilt idea I was starting (the bee quilt kinda took it's place for now lol) The box has the scraps Mary sent to me to help with my scrap quilt. (*waves* Hi Mary! :) Soon as I'm done with the bee quilt (I'll have to post an update here on that one sometime this week!) I'll be getting back to work on that scrap quilt...it's really pulling me to start it! lol
The plastic drawers to the right house all my quilting supplies....books, magazines, all the miscellany crap we quilters tend to collect!! One of the drawers also still contains scraps that I have yet to sort. Those drawers are still quite a mess. I'll tackle them someday....sort and reorganize them all. For now, meh...it's hidden, good 'nuff for me!

This is the top of the dresser in the corner. My thread storage....I think this is my favorite part of my little redo. Before this I kept all my thread in a bag or a bin, and just dug thru when I needed to change my threads. It really kinda sucked. So, this thrills me. :) I found the little shelf unit at a thrift shop, spray painted it and added the nails for the bobbins. I prefer to store my thread spools and bobbins together so I know exactly what's what. I use both cotton and poly threads so I have to keep it all straight. This works perfectly. I'd rather have somewhere out of the light to put it, but, it's the only place it fits, so it's staying for now. I use thread pretty quickly anyway, so I'm not too worried. I love that it's easy to see what I'm running low on...light greys (my usual piecing thread) by the looks of it. lol I know what to order this way! :) I'm slowly making the switch to a different thread, so this also lets me see what I need to start using up. ha!
In the small silver dish I store my curved safety pins for basting. The large round tin behind it is all buttons, as well as the pretty jar next to it! The small set of drawers are needles and rotary blades. The next container up is floss/thread and in the rope bowl is elastics and ties. The wall...the little tester wonky block I did when making a zip pouch. I was trying to figure out what size to make and how well I'd do making a wonky star this small. I like to tack things up to the wall with old, dull sewing needles. Gives me something to do with them, and they leave a smaller hole in the wall!

Of course we have some owls!! My little lookout owls. :) The little guy on the right sits up in my thread organizer. He's the first one I made and sat without eyes for the longest time....poor thing. (I told myself he was better off blind...then he wouldn't see when I was about to stick him! ;) I did give him some eyes when I retired him up to the shelf tho. Now he just holds my handsewing needles...which I don't use very often. He likes to feel useful tho!
The other little guy I made when we had the pincushion swap on threadbias. I fell in love with the one I made for my partner so I made him a twin to keep me company and guard my machine. :) I have yet to stick this little guy. He has those big eyes that tear up and give me 'the look' when I come near him with a pin. So, he just keeps me company! Didn't get a shot of the other owls in my space, but you may catch a peak of them in some of the other photos. lol
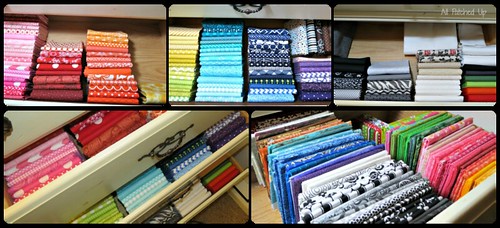
Last but not least...my stash. I spent the better part of two days sorting, folding, organizing fabric! I wanted to put the dresser to use and since my meager little stash had outgrown it's single drawer in the plastic trays, I could organize things better by using the dresser for fabric storage. The top drawer is my FQ's...the bottom right photo. Altho...Mr Man got to those and has now used a good chunk of them up! lol The other half of the top drawer is for misc things....zippers, ribbons, etc. The 2nd, 3rd and 4th drawer are my yardage....all in color order (which I LOVE!) and folded nice and neat. This has allowed me to see what I'm lacking and need to stock up...kinda low on the yellow and purple...some reds. It also confirms what I typically use and buy. lol Lots of greens and teals and pink! The 4th drawer is my neutrals and my kona solids. Don't know why, I've always kept them separate. *shrug* The bottom drawer holds odd fabrics...knits, blends, polys, denim, novelty and some oddball project items.
Overall, I like the set up, but in the weeks I've been using the space I've discovered some things I need to fix. The lack of a design wall for starters. Did you notice that went missing?! I certainly have. It's a desperate need for me to figure that one out. I don't work well without a place to put my stuff while I'm working on it. I'm visual and need to 'see' it. I've always had one too which makes it tough to be without. I'm working on the remedy.
But, one thing I didn't expect....or foresee.
I didn't like taking my machine away from the window, but thought I'd eventually get used to it. I did. Shortly after I took all the photos, we ran into a great deal at Joann...there was an Ottlite sale and we ended up with one of the floorlamps and a matching desklamp for the price of just one. (as of today, both my local Joann's are still running that sale so you may wanna go check it out yourself...It's a 'buy the desklamp get the floorlamp free' deal...$300 worth of ottlites for $100!!) So, the floorlamp sits by my sewing table and the desklamp sits on my cutting table. Mr. Man took over my tulip lamp for use by his own machine. lol We got a lot of light goin on in here when we're sewing!! I love all the light and don't miss being in front of the window much at all.
However, the table where it is, without another table to my left is not working so well. While putting the sashing strips on my log cabin quilt, I discovered how much I missed having that table there to hold the 'excess'. The more sashing strips I got on, the worse it got. So, no matter how much I like this set up, I may have to move it all around again to find something that works better. I really can't imagine how I'll actually quilt that bad boy the way things currently are. So yeah, need to fix that very soon as that one will be ready for quilting in no time.
My computer is also an issue. It sitting on a small tvtray next to my sewing table isn't working well at all. So, that needs to be rectified. If I try to work on something large, it'll be in the way anyway.
So....It's neat, it's tidy, I like the setup for the most part, but I see another redo in my near future. *sigh*
Alright...time to wrap up this incredibly long post. (sorry bout that, I got a bit carried away!) I still can't believe I'm going thru with posting my scary photos, but I made a promise...and I kept it! whew!
Stay tuned later today (possibly tonight depending on how many photos I have to edit) for a block tutorial. Yep, it's that time again. :)


